
How to Install FlowGuard Gold CPVC
FlowGuard Gold CPVC’s one-step solvent welding process makes it easy to assemble a plumbing system. Solvent welding creates a permanent molecular bond between the pipe and the fitting, so that they function as a single unit.
To ensure a hassle-free installation, just follow these five steps, which are based on the instructions created by the Plastic Pipe and Fittings Association. Before you get started, always be sure that you are following your local codes and the manufacturer’s instructions.
1. Cut the pipe
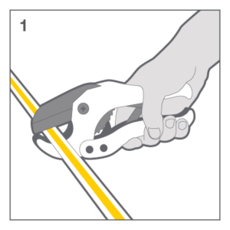
For new FlowGuard Gold installations, use ratchet cutters, wheel cutters, close quarters (c-style) cutters, or a fine tooth saw to cut the pipe. Never use a scissors-style PEX cutter. If you are cutting into previously installed piping, do not use a ratchet cutter. We recommend using a fine tooth saw when cutting into aged CPVC, however wheel cutters & close quarters (c-style) cutters may be used under the right conditions.
If you see any damage to the piping end, cut back at least 2” beyond the visible damage.
2. Prepare the pipe and fittings
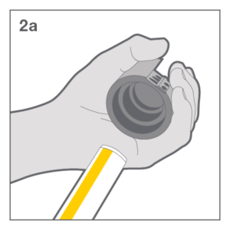
(a) Remove any burrs or filings, and use a chamfering tool to bevel the end of the pipe. You can use a sharp knife or file if a chamfering tool is not available. Use a clean, dry rag to remove any dirt or moisture from the joint surfaces.
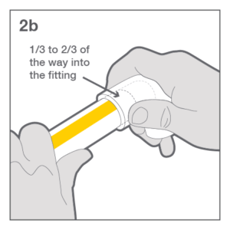
(b) Check the fit of the pipe and fitting. At this stage, the pipe should make contact with the socket wall 1/3 to 2/3 of the way into the socket. If the pipe goes all the way in at this stage, you should discard the fitting.
After you check the fit, immediately proceed to Step 3. Don’t check multiple fittings at once – doing so increases the risk of an installation error.
3. Apply FlowGuard Gold One-Step Solvent Cement
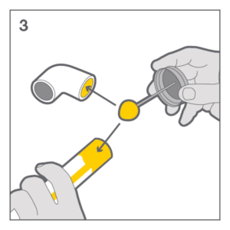
Apply a heavy, even coat of FlowGuard Gold one-step solvent cement to the outside of the pipe end. Then use the same applicator, without additional cement, to apply a thin coat inside the socket.
Ensure you have 360º coverage on the pipe and that the cement does not puddle inside the fitting.
To help reduce the risk of a dry-fit, FlowGuard Gold solvent cements are available with a specially formulated UV indicator, so that you can check your solvent-welded joints using a simple UV flashlight.
4. Assemble the joint
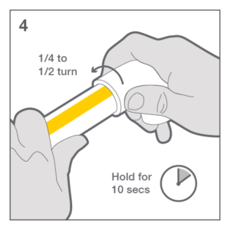
After applying solvent cement, immediately insert the FlowGuard Gold pipe into the fitting. While you insert the pipe, rotate it ¼ to ½ turn – this will help to ensure the even distribution of cement. Then, align the fitting and hold the assembly for about 10 seconds, allowing the joint to set.
5. Verify proper installation
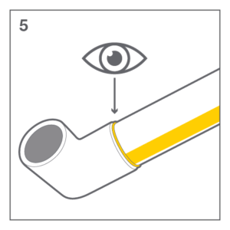
Check the joint to make sure that you can see an even bead of cement around it. If you don’t see this bead, it could mean that the solvent cement was not properly applied. In that case, you should cut out the joint and remake it with a new fitting. Verifying the presence of a continuous solvent cement bead at the fitting is a critical step to prevent dry fits and ensure system integrity.
For easy reference on the job, print out our simple installation guides in English and Spanish. In addition to step-by-step instructions on how to install FlowGuard Gold, these guides provide valuable information about expansion & contraction and other installation tips. And for more in depth details regarding FlowGuard Gold CPVC installation, check out our step-by-step instructions.